ARTWORK PREPARATION
You need to create the artworks. Please be aware that canvas comes in different orientations. Portrait, Landscape and Square. Because of that, there is no "one artwork fits all" solution. But in this article, we will show you some tricks if you prefer to create generic artworks that can fit all sizes. 
- If you like to create artwork for each orientation and get better results we recommend you to use our production files.
- You can find PSD and TIFF Files here: https://drive.google.com/drive/u/0/folders/18iRrOcAZ6hzqAJ8-dOTZpNKmKDy_VnTy
- If are planning to create an artwork that might fit (with some small imperfection about proposition) all try to use the Square (20X20, 18X18, 16X16, 12X12, 10X10 CANVAS TEMPLATE.psd) or 24x18, 16x12 CANVAS TEMPLATE.psd file in the folder.

- Recommended size for landscape orientation is 4285px x 3385px and min 150 DPI.
CREATING ARTWORKS
Using AOP AOP+ Production Files
- Open the production file you would like to edit.

- Place your artwork on the YOUR ARTWORK HERE layer.

- Your artwork needs to cover the whole canvas in PS.

- Keep your main object in the Safe Area (Red Line).
- Product Line (Blue Line) means the edges of the canvas when you look from the front.
- Side-Line (Green Line) will show you what part of your artwork will be on the side of the canvas.

- To avoid problems because of shifting while we printing and warping the canvas, do not put any specific objects (like text etc.) in between the Product Line and Sidelines. Use patterns or solid background.

- Turn off the GUIDE layer.

- Export and SAVE as PNG or JPEG. (For smaller file size use JPEG)
UPLOADING AND CREATING THE PRODUCT ON AOP+

- Login to AOP+ app. https://alloverprint.net/user/dashboard
- Click to the COLLECTIONS on the top menu. https://alloverprint.net/collections
- Click ADD YOUR IMAGE and select your first artwork.
- Give a name to your collection and hit CREATE COLLECTION.

- Once the upload is done, you will see your collection in the list.
- Click on the collection you would like to edit.
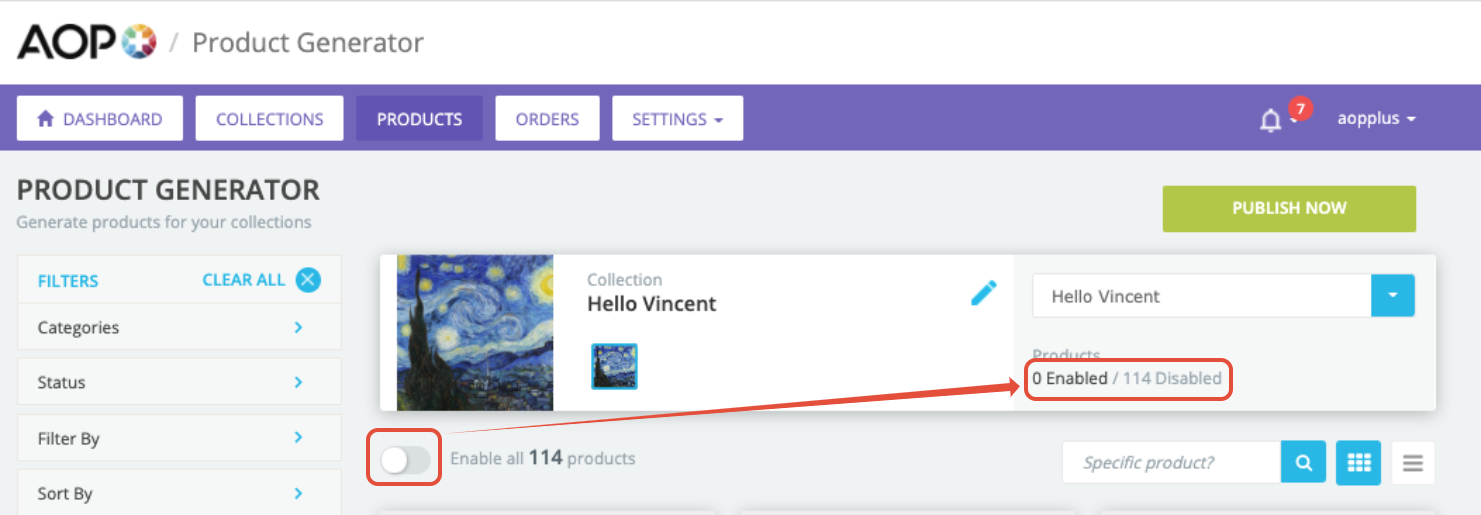
- Make sure you click ENABLE for all products, then DISABLE to avoid the selection of unnecessary products.

- In the search area, type “CANVAS” (Or on the Left Menu > Categories > Wall Decor)
- Click ENABLE, then EDIT.

- Click the small thumbnail of your design to add that to the product generator.
- By default, you will see the mockup of 10x8".
- Because of the orientation of the product (Portrait, Landscape, Square), you will need to position your artwork for each variation you would like to publish.
- Untick "Apply to all models", which will help you to position your artwork per variation differently.

- If you used our production template you do not need to play with the zoom tool.
- Click to the variation on the right menu to position your artwork. Make sure to untick "Apply to all models"

- If you have created artworks for each size, click on the variation and upload the artwork by clicking Add Artwork to the variation. (Make sure to untick "Apply to all models")

- We display all variations on the right tab. Make sure to scroll down to see landscape versions.

- If you didn't create artwork per orientation, you will need to use the zoom tool a bit.

- There are so many variations of the product, enable the ones you like to publish.
- You can also enable the finish you like. Gloss, Matte or Silk (Semi-Gloss)

- In the description section, you can review/edit the description and title.
- Check the Shipping section to see shipping costs. (UK and USA orders will be automatically upgraded to FedEx Expedited Shipping, you do not need to do anything)
- And finally, make sure to review the pricing section to add your markup and decide your sale price. Remember, if you are a Super Member 5% and for Hero members, 10% discount will be applied on the cost price.

- Hit the SAVE THE PRODUCT button on the top right corner.

- Click PUBLISH NOW and start selling.


Need help? Contact Us